Understanding the Chicago Apartment Application Process

Table of Contents
- You’ve Just Found the Perfect Apartment. What Next?
- The Step-by-Step Apartment Application Process 📋
- Summary – Apartment Application Checklist
- Common Mistakes & How to Avoid Them
- Mistake #1: Waiting Too Long to Apply
- Mistake #2: Overestimating Up Front Costs for Managed Apartments
- Mistake #3: Underestimating Time Needed for Processing
- Mistake #4: Assuming Multiple Applications Are Accepted Per Unit
- Mistake #5: Having Frozen Credit During the Application Process
- Mistake #6: Forgetting Required Documents
- Our Best Advice for Renters
If you’ve ever wondered, “What’s the apartment application process like in Chicago?”—you’re not alone! It’s one of the first questions we get from renters, and the good news? Chicago managed rental buildings keep things pretty straightforward.
From the online application itself to the screening phase and everything that follows, they all have a pretty structured application process. Let us explain as we walk you through all of the steps. We’ll also cover common mistakes and how you can avoid them. We hope that our insight will allow you to approach this part of renting with confidence.
Let’s get you on your way to understanding how it all works!
You’ve Just Found the Perfect Apartment. What Next?
Once you find an apartment you love, you’ll fill out an application. Your leasing agent will let you know how to apply, but almost all of our partner properties offer an online application on their website. The application itself is a step-by-step form that collects personal details for all adult occupants, the key elements being:
- your full name and contact info,
- employment info including gross monthly income,
- previous rental history,
- emergency contact info,
- vehicle and pet info (if applicable).
Filling out an application is the obvious first step, but there’s more to the process than that. Let’s break the rest of it down, step by step.
The Step-by-Step Apartment Application Process 📋
Step 1 – Filling Out the Application Online
All adults ages 18+ who will be living in the apartment must apply. When two or more applicants will be living together, they’ll usually complete a single application jointly. So if you’re applying with a roommate, you (the primary applicant) will create an online account and begin the application for the apartment, and you will then invite your roommate (via emailed link) to add their info to the joint application.
If the application has a place to upload your government-issued photo ID or proof of income (most recent pay stubs, new job offer letter, tax return) and if you have it ready, go ahead and attach it to the application. If you don’t have this info handy please inform your leasing agent–they will likely recommend that you skip attaching this info for now and instead upload or email it separately within the next 24-72 hours.
Income requirements vary by building. In most cases, you’ll need to show proof that your gross monthly income is at least three times the rent. Some properties may require gross monthly income at 2.5x or 3.5x the rent instead. If you don’t meet a building’s income requirement on your own, ask your leasing agent about adding a co-signer or guarantor to your application.
-Lala, recent renter
Step 2 – Paying Standard Fees & Reserving the Unit
The most critical part of filling out the online application is to complete all required fields, pay the required application and/or admin fees, and finally, submit the application to management. When you do all three things, you should receive an email confirmation that your application was successfully submitted.
You will almost always pay the application and admin fees online by credit/debit card or bank account transfer at the end of the application. Most application fees range from $50-$75 per person and cover the property’s cost of credit and background screening. These are always non-refundable.
In lieu of a security deposit, most managed properties also charge an “admin fee” at the time of application (or immediately upon approval). Paying this fee takes an apartment off the market and reserves it for you, and it also covers the cost of professionally “turning” the unit: repairs, fresh paint, and deep cleaning to ensure your new place is in mint condition on move-in day.
The amount of the admin fee varies–we see it range between $250-$700 per apartment, but $400-$500 per apartment is the most common amount charged. This fee is also non-refundable, unless your application is declined.
Apartments are generally reserved on a first-come, first-served basis, where the first applicant(s) to pay the fees and submit their application to management will “win” the unit. So it’s important to complete this step as soon as possible in order to take your favorite apartment off the market.
Step 3 – Following Up with the Leasing Office
Let’s say you’ve now done the work of applying and reserving an apartment. Great! But you still need to reply promptly to all requests for additional info. If you didn’t attach your proof of income or a copy of your photo ID to the application already, make sure you submit this to the leasing office as soon as possible! We recommend doing so within 24 hours. You can usually add it to your online application or email it directly to the property agent–feel free to ask them what’s best.
Some properties will ask you to complete additional identity verification online, even if you toured in person. If this is necessary, the property agent will send you instructions.
The best thing you can do at this step is stay in close contact with the property where you’ve applied. (And also with your external leasing agent if you’re working with one!)
-Nancy, recent renter
Step 4 – Waiting for Application Processing
Once you’ve submitted all of the required information, the next step is to wait while the property agent processes your application. A third-party company will conduct a credit check, while the agent verifies your income and employment. They will also perform a standard criminal background check and review your rental history. Finally, a property or leasing manager will evaluate your file and make the final decision on approval.
How long does all of this take? It varies. Sometimes a property will complete processing in 72 hours, but we advise our customers to allow a full week (give or take) for an update.
Here are some factors that may increase your wait time:
- Having incorrect application info, invalid identification, or missing documents
- A high volume of applications at the property (especially common at new buildings)
- Holidays and regularly scheduled days off for building leasing staff
- Your move date being more than 2 weeks away (buildings will prioritize applications with the soonest move-in dates first)
- A change in the building ownership, management company, or staff
- A more complex financial or moving situation (e.g., self-employed applicants, international applicants)
- Having to add a co-signer or guarantor
Step 5 – Application Approved! What Happens Next?
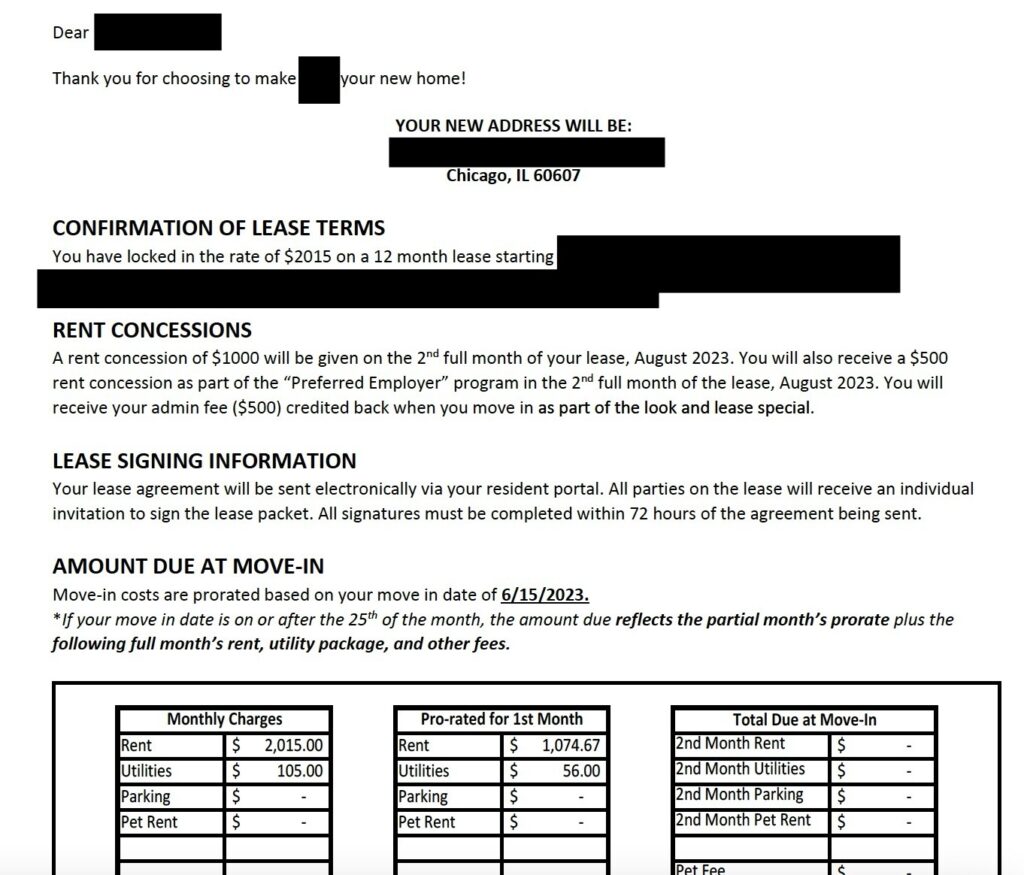
Let’s say you meet all of the building’s qualifying standards and the leasing office determines that you’re approved. Congrats! You can expect to receive an email notifying you of the approval, commonly called a “welcome letter.” This welcome letter will usually restate your unit number, rent amount, lease start and end date, and any rent concessions (specials or money off) that you’re receiving. It’ll likely also include next steps for scheduling your move-in, setting up utilities as needed, and how and when to make your first rent payment.
Step 6 – What If You’re Not Approved?
On the flip side, what if the building informs you that your application has been declined? You still have some options. First, determine the reason why you weren’t approved. Common reasons for a declined application are:
- insufficient income,
- past rental history issues,
- non-satisfactory credit history.
Ask the leasing office if there’s anything you can do to try and change your status to “approved.” In some cases you might be able to add a guarantor, provide additional income proof, or correct errors on your credit report, and then have the property rescreen your application. You can also explore applying for a different apartment with a separate management company that has different qualifying standards.
Summary – Apartment Application Checklist
Here’s a quick step-by-step summary of the entire process:
- Fill out the online application completely (all required fields).
- Pay the application/admin fees and submit the application.
- Follow up with the leasing office–attach proof of income and any other needed documents.
- Wait for approval.
- Receive the welcome letter and prepare for move-in.
Common Mistakes & How to Avoid Them
Here are some of the most common mistakes we’ve seen renters make, and how you can avoid them:
Mistake #1: Waiting Too Long to Apply
❌ Waiting until you’re at home or for a more “convenient” time/place to apply, instead of just doing it immediately.
✅ Fix: Apply on the spot! It only takes about 10 minutes to complete an application, and many buildings will let you use a computer onsite for this. If a computer isn’t available, you can apply from your smartphone.
Mistake #2: Overestimating Up Front Costs for Managed Apartments
❌ Worrying about having to fork over an application fee, move in fee, elevator fee, security deposit, and/or first/last month’s rent up front.
✅ Fix: Don’t worry about this! Check with your agent to be certain of requirements for a specific property, but know that most managed apartment buildings in Chicago require only an application fee and admin fee up front to reserve a unit. Only a handful of buildings require a security deposit or an additional move-in fee.
Mistake #3: Underestimating Time Needed for Processing
❌ Not knowing how long it takes to process an apartment application. Thinking you will apply, be approved, sign a lease, and move in all within a day or two.
✅ Fix: Allow plenty of time (we usually say a full week, give or take) for your application to be processed. While quicker turnaround times are sometimes possible, there are many factors that can cause the process to take longer. Stay patient and maintain close communication with your agent and the property while you wait to hear back.
Mistake #4: Assuming Multiple Applications Are Accepted Per Unit
❌ Worrying after you submit your application about whether someone else will apply for the same apartment, and “beat out” your application.
✅ Fix: Realize that most Chicago managed rental apartments are first-come, first-served. In this case, your submitted application reserves the apartment just for you while the property does their screening. (Unlike the process with condo units, where multiple applications per unit are the norm!)
Mistake #5: Having Frozen Credit During the Application Process
❌ Having frozen credit will hinder the screening process and can even result in an initially declined application.
✅ Fix: Unfreeze your credit online or by phone as soon as you intend to fill out an application.
Mistake #6: Forgetting Required Documents
❌ Not having proof of income or valid ID ready, which delays the approval process.
✅ Fix: Prepare these before even touring apartments. Make sure your government-issued ID is valid and not expired.
Our Best Advice for Renters
In addition to following all of the tips above, we recommend that you work with an agent to really maximize your support and minimize stress. After matching you with the right apartment, we can help you navigate the apartment application process. We’ll stay in touch with you to help make sure everything goes as smoothly as possible!
Final Notes & Disclaimer
This guide outlines the general steps of applying for most Chicago managed apartment buildings, but keep in mind that your specific application may involve additional steps or unique requirements. Think of this as a helpful starting point, and don’t hesitate to reach out to your leasing agent if you have any questions along the way.
Also, remember that apartment application policies can change. Things like fees, requirements, and screening rules vary from building to building, so it’s always a good idea to check with your leasing agent for the most up-to-date info.
Ready to find your perfect Chicago apartment and get expert guidance every step of the way? Reach out to us!
Similar posts
-

Advice and Tips
HotSpot Picks
Luxury Apartments in Chicago
Search Tips
The Most Fitness-Friendly Apartments in Chicago
-

Advice and Tips
Luxury Apartments in Chicago
Relocation Advice
Your Guide to Moving to Chicago
-

Advice and Tips
Luxury Apartments in Chicago
Dive into Luxury this Summer: Chicago’s Best Apartments with Pools